
Creating a calculator is one of the best beginner projects for learning how HTML forms, CSS layouts, and JavaScript functions work together. Instead of building another basic addition and subtraction app, this tutorial will show you how to create a simple JavaScript calculator that solves a practical problem: comparing the potential risk and reward of a trade.
Before writing the code, you can examine a working example at https://iamforextrader.com/en/tools/risk-reward-calculator/. It demonstrates how several user inputs can be converted into clear results such as risk per unit, potential reward, total risk, and the risk-to-reward ratio.
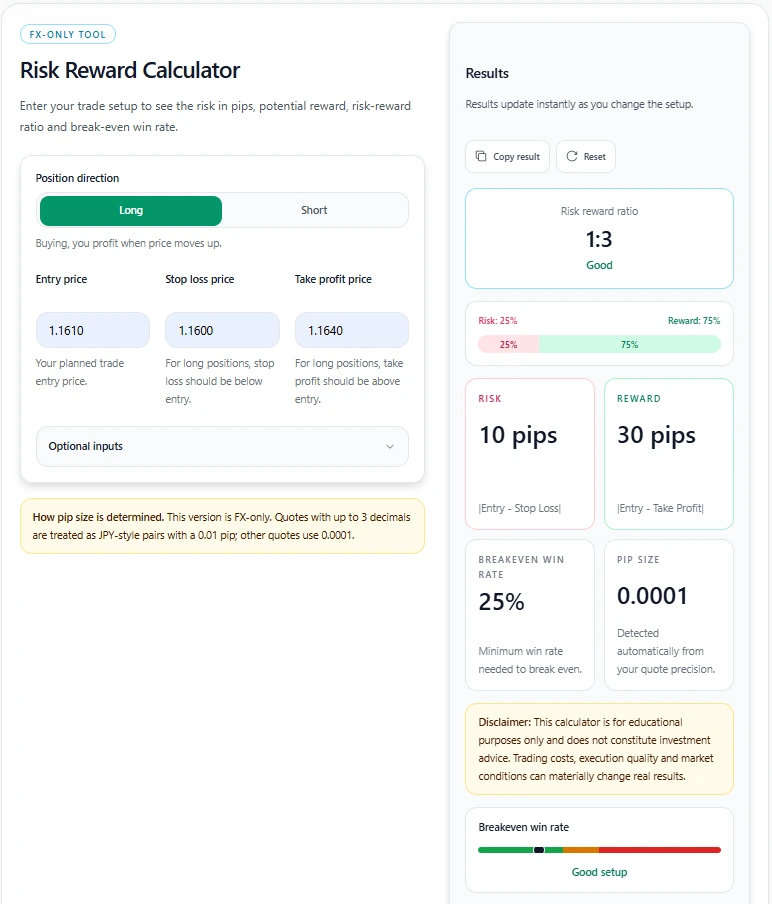
Our version will be intentionally simple. It will use plain HTML, CSS, and JavaScript, so beginners can understand every part without installing a framework or additional library.
A useful calculator does not merely produce a number; it makes the assumptions behind that number easy to inspect.
What Will the Calculator Do?
The calculator will ask the user to enter:
- Trade direction: long or short
- Entry price
- Stop-loss price
- Target price
- Position quantity
It will then calculate:
- Risk per unit
- Reward per unit
- Total monetary risk
- Total potential reward
- Risk-to-reward ratio
Here is a quick overview of the required inputs.
| Input | Description | Example |
|---|---|---|
| Direction | Whether the position is long or short | Long |
| Entry price | Price at which the position begins | 100 |
| Stop-loss price | Price at which the loss is limited | 96 |
| Target price | Planned exit price if the position moves favorably | 110 |
| Quantity | Number of units in the position | 5 |
With these example values, the risk per unit is 4, while the potential reward per unit is 10. For five units, the total risk is 20 and the potential reward is 50. The resulting risk-to-reward ratio is 1:2.5.
The calculator is an educational programming project. Its result describes the numbers entered by the user and does not predict whether a real trade will succeed.
Understanding the Formula
For a long position, the basic formulas are:
Risk per unit = Entry price - Stop-loss price
Reward per unit = Target price - Entry price
Total risk = Risk per unit × Quantity
Total reward = Reward per unit × Quantity
Reward-to-risk multiple = Total reward ÷ Total risk
For a short position, the price relationships are reversed:
Risk per unit = Stop-loss price - Entry price
Reward per unit = Entry price - Target price
Using absolute values might appear easier, but validating the direction is better. For example, a long position normally requires the stop-loss to be below the entry price and the target to be above it. Validation helps the user notice incorrectly entered values.
Step 1: Create the HTML Structure
Create a file named index.html and add the following code:
<!DOCTYPE html>
<html lang="en">
<head>
  <meta charset="UTF-8">
  <meta name="viewport" content="width=device-width, initial-scale=1.0">
  <title>Risk-Reward Calculator</title>
  <link rel="stylesheet" href="styles.css">
</head>
<body>
  <main class="calculator">
    <h1>Risk-Reward Calculator</h1>

    <p class="intro">
      Enter the planned prices and position quantity to calculate
      the potential risk and reward.
    </p>

    <div class="form-grid">
      <label for="direction">Position direction</label>
      <select id="direction">
        <option value="long">Long</option>
        <option value="short">Short</option>
      </select>

      <label for="entry">Entry price</label>
      <input
        id="entry"
        type="number"
        min="0"
        step="any"
        placeholder="100"
      >

      <label for="stop">Stop-loss price</label>
      <input
        id="stop"
        type="number"
        min="0"
        step="any"
        placeholder="96"
      >

      <label for="target">Target price</label>
      <input
        id="target"
        type="number"
        min="0"
        step="any"
        placeholder="110"
      >

      <label for="quantity">Quantity</label>
      <input
        id="quantity"
        type="number"
        min="0"
        step="any"
        placeholder="5"
      >
    </div>

    <button id="calculateButton" type="button">
      Calculate
    </button>

    <p id="errorMessage" class="error" role="alert"></p>

    <section id="results" class="results" hidden>
      <h2>Calculation Results</h2>

      <dl>
        <div>
          <dt>Risk per unit</dt>
          <dd id="riskPerUnit">—</dd>
        </div>

        <div>
          <dt>Reward per unit</dt>
          <dd id="rewardPerUnit">—</dd>
        </div>

        <div>
          <dt>Total risk</dt>
          <dd id="totalRisk">—</dd>
        </div>

        <div>
          <dt>Potential reward</dt>
          <dd id="totalReward">—</dd>
        </div>

        <div>
          <dt>Risk-to-reward ratio</dt>
          <dd id="ratio">—</dd>
        </div>
      </dl>
    </section>
  </main>

  <script src="script.js"></script>
</body>
</html>
The form uses descriptive labels instead of relying only on placeholders. This makes the interface easier to understand and more accessible.
The results section begins with the hidden attribute. JavaScript will display it only after the inputs pass validation and the calculation is complete.
Step 2: Style the Calculator with CSS
Create a second file named styles.css:
* {
  box-sizing: border-box;
}

body {
  margin: 0;
  padding: 32px 16px;
  font-family: Arial, sans-serif;
  background: #f4f6f8;
  color: #20252b;
}

.calculator {
  width: min(100%, 680px);
  margin: 0 auto;
  padding: 28px;
  background: #ffffff;
  border: 1px solid #dfe3e8;
  border-radius: 12px;
  box-shadow: 0 8px 24px rgba(0, 0, 0, 0.08);
}

h1,
h2 {
  margin-top: 0;
}

.intro {
  line-height: 1.6;
  color: #56606b;
}

.form-grid {
  display: grid;
  grid-template-columns: 1fr 1.5fr;
  gap: 14px;
  align-items: center;
  margin: 24px 0;
}

label {
  font-weight: 600;
}

input,
select,
button {
  width: 100%;
  min-height: 44px;
  padding: 10px 12px;
  font: inherit;
  border-radius: 6px;
}

input,
select {
  border: 1px solid #bcc5cf;
}

input:focus,
select:focus {
  outline: 2px solid #2367d1;
  outline-offset: 2px;
}

button {
  border: 0;
  background: #2367d1;
  color: #ffffff;
  font-weight: 700;
  cursor: pointer;
}

button:hover {
  background: #194f9f;
}

.error {
  min-height: 24px;
  color: #b42318;
  font-weight: 600;
}

.results {
  margin-top: 20px;
  padding: 20px;
  background: #f7f9fc;
  border-radius: 8px;
}

.results dl {
  margin: 0;
}

.results dl div {
  display: flex;
  justify-content: space-between;
  gap: 20px;
  padding: 10px 0;
  border-bottom: 1px solid #dfe3e8;
}

.results dl div:last-child {
  border-bottom: 0;
}

.results dt {
  font-weight: 600;
}

.results dd {
  margin: 0;
}

@media (max-width: 520px) {
  .calculator {
    padding: 20px;
  }

  .form-grid {
    grid-template-columns: 1fr;
    gap: 8px;
  }

  .form-grid input,
  .form-grid select {
    margin-bottom: 8px;
  }
}
This CSS creates a clean card layout that works on desktop and mobile screens. The form uses two columns on wider screens and switches to a single-column layout on smaller devices.
Step 3: Add the JavaScript Calculation
Create a file named script.js:
const directionInput = document.getElementById("direction");
const entryInput = document.getElementById("entry");
const stopInput = document.getElementById("stop");
const targetInput = document.getElementById("target");
const quantityInput = document.getElementById("quantity");

const calculateButton = document.getElementById("calculateButton");
const errorMessage = document.getElementById("errorMessage");
const results = document.getElementById("results");

const riskPerUnitOutput = document.getElementById("riskPerUnit");
const rewardPerUnitOutput = document.getElementById("rewardPerUnit");
const totalRiskOutput = document.getElementById("totalRisk");
const totalRewardOutput = document.getElementById("totalReward");
const ratioOutput = document.getElementById("ratio");

function readPositiveNumber(input) {
  const value = Number(input.value);

  if (!Number.isFinite(value) || value <= 0) {
    return null;
  }

  return value;
}

function formatNumber(value) {
  return new Intl.NumberFormat("en-US", {
    maximumFractionDigits: 4
  }).format(value);
}

function showError(message) {
  errorMessage.textContent = message;
  results.hidden = true;
}

function calculateRiskReward() {
  errorMessage.textContent = "";

  const direction = directionInput.value;
  const entry = readPositiveNumber(entryInput);
  const stop = readPositiveNumber(stopInput);
  const target = readPositiveNumber(targetInput);
  const quantity = readPositiveNumber(quantityInput);

  if (
    entry === null ||
    stop === null ||
    target === null ||
    quantity === null
  ) {
    showError("Enter a positive number in every price and quantity field.");
    return;
  }

  if (direction === "long" && !(stop < entry && entry < target)) {
    showError(
      "For a long position, use: stop-loss < entry price < target price."
    );
    return;
  }

  if (direction === "short" && !(target < entry && entry < stop)) {
    showError(
      "For a short position, use: target price < entry price < stop-loss."
    );
    return;
  }

  let riskPerUnit;
  let rewardPerUnit;

  if (direction === "long") {
    riskPerUnit = entry - stop;
    rewardPerUnit = target - entry;
  } else {
    riskPerUnit = stop - entry;
    rewardPerUnit = entry - target;
  }

  const totalRisk = riskPerUnit * quantity;
  const totalReward = rewardPerUnit * quantity;
  const rewardToRisk = totalReward / totalRisk;

  riskPerUnitOutput.textContent = formatNumber(riskPerUnit);
  rewardPerUnitOutput.textContent = formatNumber(rewardPerUnit);
  totalRiskOutput.textContent = formatNumber(totalRisk);
  totalRewardOutput.textContent = formatNumber(totalReward);
  ratioOutput.textContent = `1 : ${formatNumber(rewardToRisk)}`;

  results.hidden = false;
}

calculateButton.addEventListener("click", calculateRiskReward);
This code follows a clear sequence:
- Read the values from the form.
- Convert the strings into numbers.
- Reject empty, invalid, zero, or negative values.
- Check whether the prices match the selected direction.
- Calculate the results.
- Update the page using
textContent.
Using textContent is preferable when displaying plain values because the browser treats the output as text rather than HTML.
Why the Calculator Does Not Use eval()
Some beginner calculator examples use JavaScript’s eval() function to execute a string as code. That approach may look convenient for a traditional calculator interface, but it is unnecessary here.
Our application has a small and predictable group of operations. Writing those operations explicitly makes the code:
- Easier to read
- Easier to test
- Easier to debug
- Safer to extend
- Less likely to execute unintended input
A simple JavaScript calculator should perform known calculations through normal functions rather than treating user input as executable code.
Testing the Calculator
Testing only one valid example is not enough. Try several combinations to confirm that both the formulas and validation behave correctly.
| Test | Direction | Entry | Stop | Target | Quantity | Expected result |
|---|---|---|---|---|---|---|
| Standard long | Long | 100 | 96 | 110 | 5 | Ratio 1:2.5 |
| Standard short | Short | 100 | 104 | 92 | 3 | Ratio 1:2 |
| Invalid long stop | Long | 100 | 102 | 110 | 5 | Validation error |
| Invalid short target | Short | 100 | 105 | 110 | 5 | Validation error |
| Empty quantity | Long | 100 | 95 | 110 | — | Validation error |
| Zero quantity | Long | 100 | 95 | 110 | 0 | Validation error |
Manual testing is useful for a small project, but the calculation logic could later be moved into a separate function and covered with automated unit tests.
For example:
function getRiskReward({
  direction,
  entry,
  stop,
  target,
  quantity
}) {
  const riskPerUnit =
    direction === "long" ? entry - stop : stop - entry;

  const rewardPerUnit =
    direction === "long" ? target - entry : entry - target;

  const totalRisk = riskPerUnit * quantity;
  const totalReward = rewardPerUnit * quantity;

  return {
    riskPerUnit,
    rewardPerUnit,
    totalRisk,
    totalReward,
    rewardToRisk: totalReward / totalRisk
  };
}
Separating the mathematical logic from the interface makes the function easier to reuse and test.
Useful Improvements for the Project
Once the basic HTML CSS JavaScript calculator works, you can improve it gradually instead of adding every feature at once.
Possible additions include:
- A reset button
- Currency selection
- Percentage-based risk calculations
- Automatic recalculation when an input changes
- Keyboard support
- Saved values with
localStorage - Light and dark themes
- A visual chart showing the entry, stop, and target levels
- Automated tests for the calculation function
- More precise handling of decimal values
For financial applications that require exact monetary accounting, developers should also learn about floating-point precision. JavaScript numbers can produce results such as 0.1 + 0.2 = 0.30000000000000004. Display formatting hides many small precision artifacts, but production accounting systems may require integer minor units or a decimal arithmetic library.
Common Beginner Mistakes
When building this project, watch for these common problems.
Reading Input Values as Strings
The value property of an HTML input is always a string. Without conversion, JavaScript may concatenate values instead of adding them numerically.
const incorrect = "10" + "5"; // "105"
const correct = Number("10") + Number("5"); // 15
Forgetting Direction Validation
A formula may still return a positive-looking result even when the stop-loss and target were entered on the wrong sides of the entry price. Checking the selected direction prevents misleading output.
Allowing Division by Zero
The reward-to-risk calculation divides the reward by the risk. The risk must therefore be greater than zero. Our validation prevents equal entry and stop prices.
Updating the Interface Before Validation
Do not display partial results while some inputs are invalid. Validate the entire form first and update the results only when all checks have passed.
Rounding Too Early
Keep the original values during the calculation and round only when displaying the result. Rounding every intermediate result can introduce unnecessary inaccuracies.
Conclusion
Building a simple JavaScript calculator is an effective way to practice several essential web development skills in one small project. You work with form elements, numeric conversion, conditional logic, reusable functions, validation, responsive styling, and dynamic page updates.
The risk-reward example is more instructive than a basic arithmetic calculator because the output depends on both mathematical formulas and logical relationships between the inputs. A long and a short position require different validation rules, while the final result must remain clear to the user.
Start with the basic version in this tutorial, test it with valid and invalid inputs, and then add features one at a time. This approach keeps the code understandable while showing how a beginner project can gradually develop into a polished and practical web application.

Leave a Reply