

In this article we will look at step by step installation of NS2 on Ubuntu. First we will look at the installation steps of NS2 for Ubuntu 16 and then for Ubuntu 18+.
NS2 Installation Steps for Ubuntu 16
Watch the below video to learn how to install NS2 on Ubuntu 16 operating system:
STEP 1
Open terminal/command window and type the following commands one-by-one:
sudo apt-get install ns2
sudo apt-get install nam
sudo apt-get install tcl
Note: Type administrator password when prompted.
Note: If you see any error/warning messages like file is locked or unable to obtain a lock, etc., just restart the system and try the commands again.
STEP 2
Type the command “nam” at the terminal to see the NAM window. If you are unable to see the NAM window, then do the following process:
- Go to https://ubuntu.pkgs.org/18.04/ubuntu-universe-amd64/nam_1.15-4_amd64.deb.html
- Download “nam_1.15-4_amd64.deb” file from the above page
- Type the command “sudo dpkg –install nam_1.15-4_amd64.deb”
Now you can work with both ns and nam on your system.
STEP 3
Save the following NS2 script in a file named ex2.tcl
#Set the simulator
set ns [new Simulator]
#Opening the network animation
set namf [open wired2.nam w]
$ns namtrace-all $namf
#open the file for tracing
set tracef [open wired2.tr w]
$ns trace-all $tracef
#creation of wired nodes
set n0 [$ns node]
set n1 [$ns node]
set n2 [$ns node]
set n3 [$ns node]
#establish the links between the nodes with bandwidth and delay
$ns duplex-link $n0 $n1 2MB 1ms DropTail
$ns duplex-link $n1 $n2 2.5MB 1ms RED
$ns duplex-link $n2 $n3 2MB 1.5ms DropTail
$ns duplex-link $n3 $n1 12MB 10ms DropTail
#creating the Tcp source and sink agents
set tcp [new Agent/TCP]
set sink [new Agent/TCPSink]
#attach the agents to the corresponding nodes
$ns attach-agent $n0 $tcp
$ns attach-agent $n2 $sink
#create the FTP Traffic
set ftp [new Application/FTP]
$ftp attach-agent $tcp
$ns connect $tcp $sink
#start the traffic
$ns at 1.0 “$ftp start”
#end the simulation
$ns at 3.0 “finish”
proc finish {} {
global ns namftracef
$ns flush-trace
close $namf
close $tracef
exec nam wired2.nam &
exit 0
}
$ns run
STEP 4
Run the script using the following command:
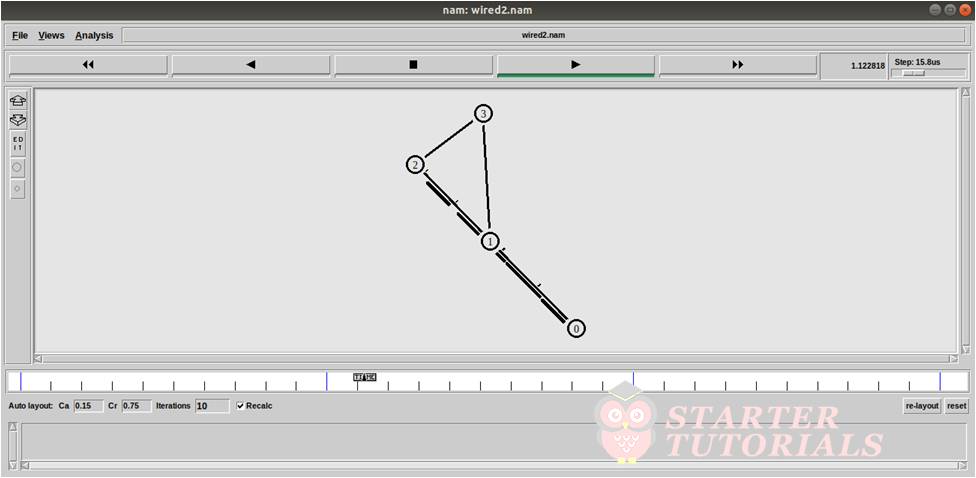
You can see the output as shown in below figure:
That’s it! NS2 is successfully installed.
Donwload NS2 installation procedure for Ubuntu 16 for distributing as handouts to your students.
NS2 Installation Steps for Ubuntu 18 and 20
Watch the below video to learn how to install NS2 on Ubuntu 18 and 20 operating systems.
Open terminal/command window and type the following commands one-by-one:
sudo apt-get install ns2
sudo apt-get install nam
sudo apt-get install tcl
Note: Type administrator password when prompted.
Note: If you see any error/warning messages like file is locked or unable to obtain a lock, etc., just restart the system and try the commands again.
STEP 2
Save the following NS2 script in a file named ex2.tcl
#Set the simulator
set ns [new Simulator]
#Opening the network animation
set namf [open wired2.nam w]
$ns namtrace-all $namf
#open the file for tracing
set tracef [open wired2.tr w]
$ns trace-all $tracef
#creation of wired nodes
set n0 [$ns node]
set n1 [$ns node]
set n2 [$ns node]
set n3 [$ns node]
#establish the links between the nodes with bandwidth and delay
$ns duplex-link $n0 $n1 2MB 1ms DropTail
$ns duplex-link $n1 $n2 2.5MB 1ms RED
$ns duplex-link $n2 $n3 2MB 1.5ms DropTail
$ns duplex-link $n3 $n1 12MB 10ms DropTail
#creating the Tcp source and sink agents
set tcp [new Agent/TCP]
set sink [new Agent/TCPSink]
#attach the agents to the corresponding nodes
$ns attach-agent $n0 $tcp
$ns attach-agent $n2 $sink
#create the FTP Traffic
set ftp [new Application/FTP]
$ftp attach-agent $tcp
$ns connect $tcp $sink
#start the traffic
$ns at 1.0 “$ftp start”
#end the simulation
$ns at 3.0 “finish”
proc finish {} {
global ns namftracef
$ns flush-trace
close $namf
close $tracef
exec nam wired2.nam &
exit 0
}
$ns run
STEP 3
Run the script using the following command:
You can see the output as shown in below figure:
That’s it! NS2 is successfully installed.
Download NS2 installation procedure for Ubuntu 18 and Ubuntu 20 for distributing as handouts to your students.

Suryateja Pericherla, at present is a Research Scholar (full-time Ph.D.) in the Dept. of Computer Science & Systems Engineering at Andhra University, Visakhapatnam. Previously worked as an Associate Professor in the Dept. of CSE at Vishnu Institute of Technology, India.
He has 11+ years of teaching experience and is an individual researcher whose research interests are Cloud Computing, Internet of Things, Computer Security, Network Security and Blockchain.
He is a member of professional societies like IEEE, ACM, CSI and ISCA. He published several research papers which are indexed by SCIE, WoS, Scopus, Springer and others.
ns simple.tcl CBR packet size = 1000 CBR interval = 0.0080000000000000002