In this article we will learn about what is a layout manager and what are the different layout managers available in Java.
A layout manager is one which automatically manages the arrangement of various of components in a container. Each container will have a default layout manager. Default layout managers for some of the container classes are given below:
Panel – Flow Layout
JPanel – Flow Layout
Applet – Flow Layout
JApplet – Border Layout
Frame – Border Layout
JFrame – Border Layout
A layout manager is an instance of that class which implements the LayoutManager interface. The layout manager can be set by using the setLayout() method whose general form is as follows:
void setLayout(LayoutManager layoutObj)
We can manually arrange the position of each component (not recommended) by passing null to setLayout() method and by using setBounds() method on each component. Different layout managers available in AWT are:
- FlowLayout
- BorderLayout
- GridLayout
- CardLayout
- GridBagLayout
Contents
FlowLayout Manager
The flow layout manager arranges the components one after another from left-to-right and top-to-bottom manner. The flow layout manager gives some space between components. Flow layout manager instance can be created using anyone of the following constructors:
FlowLayout()
FlowLayout(int how)
FlowLayout(int how, int hspace, int vspace)
In the above constructors, how specifies the alignment, hspace specifies horizontal space, and vspace specifies vertical space. Valid values for alignment are as follows:
FlowLayout.LEFT
FlowLayout.CENTER
FlowLayout.RIGHT
FlowLayout.LEADING
FlowLayout.TRAILING
Following code demonstrates working with FlowLayout:
import java.awt.*;
import java.awt.event.*;

public class MyFrame extends Frame
{
	Panel p1, p2, p3;
	Label l1, l2;
	TextField t1, t2;
	Button b;
	MyFrame()
	{
		setSize(400, 200);
		setTitle("My Application");
		setLayout(new FlowLayout());
		p1 = new Panel();
		l1 = new Label("Enter Username: ");
		t1 = new TextField(20);
		p1.add(l1);
		p1.add(t1);
		p1.setPreferredSize(new Dimension(400, 30));
		p2 = new Panel();
		l2 = new Label("Enter Password: ");
		t2 = new TextField(20);
		t2.setEchoChar('*');
		p2.add(l2);
		p2.add(t2);
		p2.setPreferredSize(new Dimension(400, 30));
		p3 = new Panel();
		b = new Button("Login");
		p3.add(b);
		add(p1);
		add(p2);
		add(p3);
		addWindowListener(new WindowAdapter()
		{
			public void windowClosing(WindowEvent we)
			{
				System.exit(0);
			}
		}
		);
		setVisible(true);
	}
	public static void main(String[] args)
	{
		MyFrame mf = new MyFrame();
	}
}
Output of the above code is as shown below:

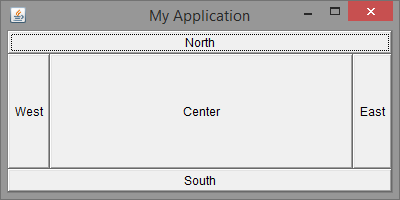
BorderLayout Manager
The border layout manager divides the container area into five regions namely: north, south, east, west, and center. Default region is center. You have to be careful with border layout as controls might be stacked over one another. Border layout instance can be created by using one of the below constructors:
BorderLayout()
BorderLayout(int hspace, int vspace)
In the above constructors, hspace signifies horizontal space between components and vspace signifies vertical space between components.
Following code demonstrates working with BorderLayout:
import java.awt.*;
import java.awt.event.*;

public class MyFrame extends Frame
{
	Button bnorth, bsouth, beast, bwest, bcenter;
	MyFrame()
	{
		setSize(400, 200);
		setTitle("My Application");
		bnorth = new Button("North");
		bsouth = new Button("South");
		beast = new Button("East");
		bwest = new Button("West");
		bcenter = new Button("Center");
		add(bnorth, BorderLayout.NORTH);
		add(bsouth, BorderLayout.SOUTH);
		add(beast, BorderLayout.EAST);
		add(bwest, BorderLayout.WEST);
		add(bcenter, BorderLayout.CENTER);
		addWindowListener(new WindowAdapter()
		{
			public void windowClosing(WindowEvent we)
			{
				System.exit(0);
			}
		}
		);
		setVisible(true);
	}
	public static void main(String[] args)
	{
		MyFrame mf = new MyFrame();
	}
}
Output of the above code is as shown below:
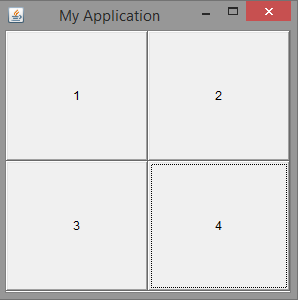
GridLayout Manager
The grid layout manager arranges the components in a 2-dimensional grid. While creating the instance of GridLayout, we can specify the number of rows and columns in the grid. Care must be taken with the number of cells in the grid and the number of components being added to the grid. If they don’t match, we might get unexpected output.
An instance of GridLayout can be created using one of the following constructors:
GridLayout()
GridLayout(int numRows, int numCols)
GridLayout(int numRows, int numCols, int hspace, int vspace)
In the above constructors, numRows and numCols specifies the number of rows and columns in the grid, hspace and vsapce specifies the horizontal space and vertical space between the components.
Following code demonstrates working with GridLayout:
import java.awt.*;
import java.awt.event.*;

public class MyFrame extends Frame
{
	Button b1, b2, b3, b4;
	MyFrame()
	{
		setSize(300, 300);
		setTitle("My Application");
		setLayout(new GridLayout(2, 2));
		b1 = new Button("1");
		b2 = new Button("2");
		b3 = new Button("3");
		b4 = new Button("4");
		add(b1);
		add(b2);
		add(b3);
		add(b4);
		addWindowListener(new WindowAdapter()
		{
			public void windowClosing(WindowEvent we)
			{
				System.exit(0);
			}
		}
		);
		setVisible(true);
	}
	public static void main(String[] args)
	{
		MyFrame mf = new MyFrame();
	}
}
Output of the above code is as shown below:
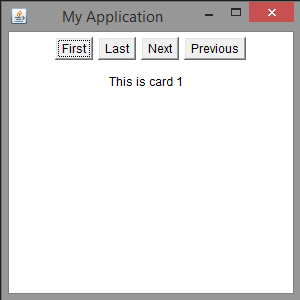
CardLayout Manager
The card layout manager allows the user to create a deck of cards. Each card can contain different components. At any instant only one card in the deck can be displayed.
To implement card layout, we must take a panel which acts as the container for other cards. Each card in turn can be a panel which can contain different components. Components will be added to the respective cards (panels) and all the cards will be finally added to the deck (container panel).
The card layout can be instantiated using any one of the following constructors:
CardLayout()
CardLayout(int hspace, int vspace)
When adding the cards (panels) to the deck, the following add() method can be used:
void add(Component panelRef, Object name)
In the above syntax, name is a string which represents the name of the card (panel). After adding all the cards (panels) to the deck, we can navigate through the cards using the following methods available in CardLayout class:
void first(Container deck)
void last(Container deck)
void next(Container deck)
void previous(Container deck)
void show(Container deck, String cardName)
Following code demonstrates working with CardLayout:
import java.awt.*;
import java.awt.event.*;

public class MyFrame extends Frame implements ActionListener
{
	Button first, last, next, prev;
	Panel bpanel, deck;
	Label l1, l2, l3;
	Panel card1, card2, card3;
	CardLayout cl;
	MyFrame()
	{
		setSize(300, 300);
		setTitle("My Application");
		first = new Button("First");
		last = new Button("Last");
		next = new Button("Next");
		prev = new Button("Previous");
		first.addActionListener(this);
		last.addActionListener(this);
		next.addActionListener(this);
		prev.addActionListener(this);
		bpanel = new Panel();
		bpanel.add(first);
		bpanel.add(last);
		bpanel.add(next);
		bpanel.add(prev);
		add(bpanel, BorderLayout.NORTH);
		cl = new CardLayout();
		l1 = new Label("This is card 1");
		l2 = new Label("This is card 2");
		l3 = new Label("This is card 3");
		card1 = new Panel();
		card2 = new Panel();
		card3 = new Panel();
		card1.add(l1);
		card2.add(l2);
		card3.add(l3);
		deck = new Panel();
		deck.setLayout(cl);
		deck.add(card1, "card1");
		deck.add(card2, "card2");
		deck.add(card3, "card3");
		add(deck, BorderLayout.CENTER);
		addWindowListener(new WindowAdapter()
		{
			public void windowClosing(WindowEvent we)
			{
				System.exit(0);
			}
		}
		);
		setVisible(true);
	}
	public void actionPerformed(ActionEvent ae)
	{
		if(ae.getActionCommand().equals("First"))
			cl.first(deck);
		else if(ae.getActionCommand().equals("Last"))
			cl.last(deck);
		else if(ae.getActionCommand().equals("Next"))
			cl.next(deck);
		else
			cl.previous(deck);
	}
	public static void main(String[] args)
	{
		MyFrame mf = new MyFrame();
	}
}
Output of the above code is as shown below:
GrdiBagLayout Manager
The grid bag layout manager can be used to create an uneven grid i.e., number of columns in each row can differ. Also the size of components within a cell can be different.
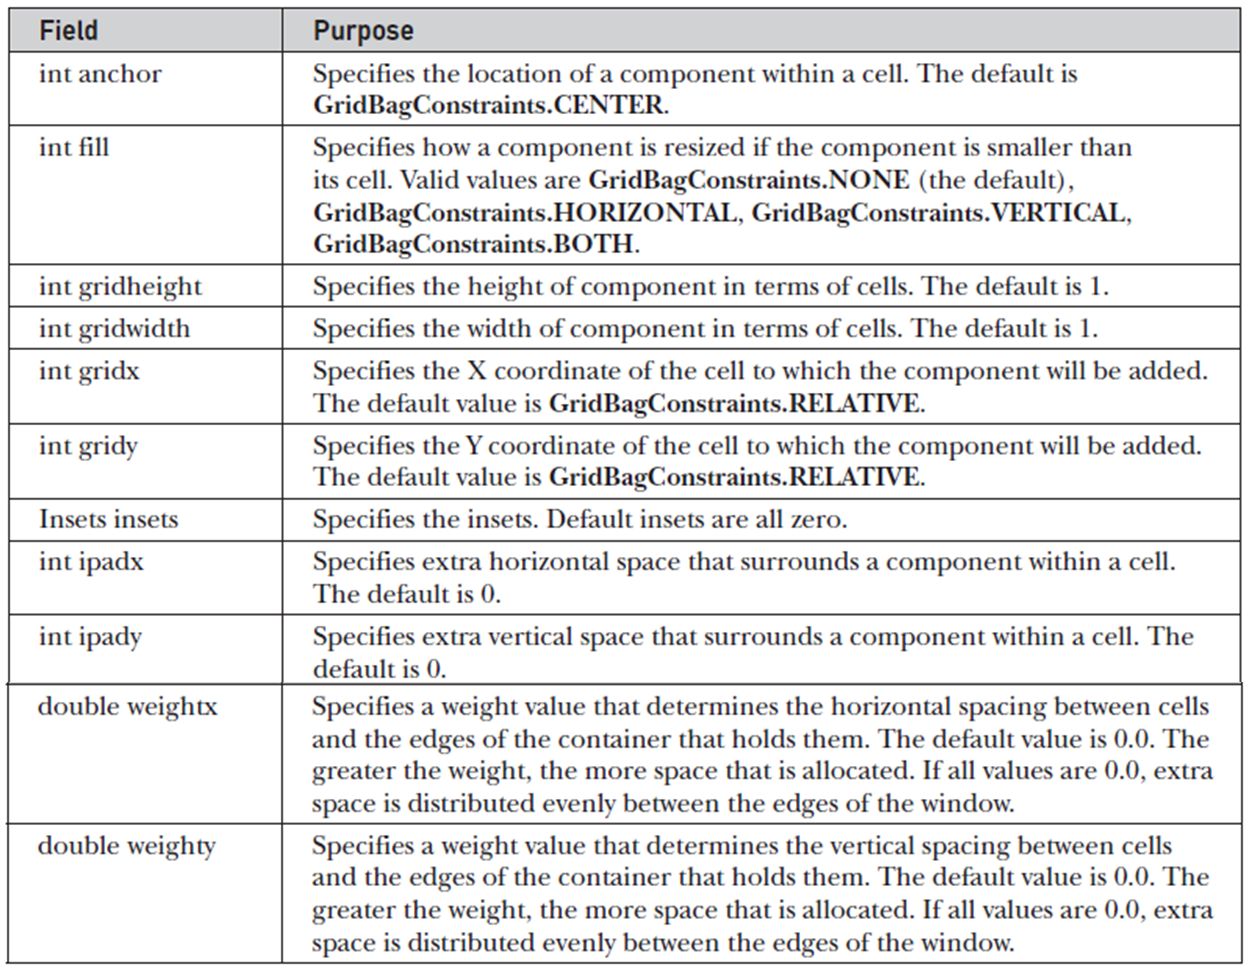
The location and size of each component are specified by a set of constraints that are contained in an object of type GridBagConstraints. These constraints include height, width, and placement of a component.
The general process to work with GridBagLayout is, first set the layout of the container to GridBagLayout, then set the constraints for each component using GridBagConstraints, and then add each component to the container.
GridBagConstraints class specifies the following fields which can be used to set constraints on each component:
Following code can be used to work with GridBagLayout:
import java.awt.*;
import java.awt.event.*;

public class MyFrame extends Frame
{
	Button b1, b2, b3, b4;
	MyFrame()
	{
		setSize(420, 300);
		setTitle("My Application");
		GridBagLayout gbl = new GridBagLayout();
		GridBagConstraints gbc = new GridBagConstraints();
		setLayout(gbl);
		b1 = new Button("Button 1");
		b2 = new Button("Button 2");
		b3 = new Button("Button 3");
		b4 = new Button("Button 4");
		gbc.weightx = 1.0;
		gbc.ipadx = 200;
		gbc.insets = new Insets(4, 4, 0, 0);
		gbc.anchor = GridBagConstraints.NORTHWEST;
		gbc.gridwidth = GridBagConstraints.RELATIVE;
		gbl.setConstraints(b1, gbc);
		gbc.gridwidth = GridBagConstraints.REMAINDER;
		gbl.setConstraints(b2, gbc);
		gbc.weighty = 1.0;
		gbc.gridwidth = GridBagConstraints.RELATIVE;
		gbl.setConstraints(b3, gbc);
		gbc.gridwidth = GridBagConstraints.REMAINDER;
		gbl.setConstraints(b4, gbc);
		add(b1);
		add(b2);
		add(b3);
		add(b4);
		addWindowListener(new WindowAdapter()
		{
			public void windowClosing(WindowEvent we)
			{
				System.exit(0);
			}
		}
		);
		setVisible(true);
	}
	public static void main(String[] args)
	{
		MyFrame mf = new MyFrame();
	}
}
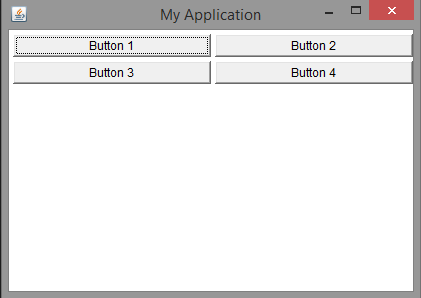
Output of the above code is as shown below:

Suryateja Pericherla, at present is a Research Scholar (full-time Ph.D.) in the Dept. of Computer Science & Systems Engineering at Andhra University, Visakhapatnam. Previously worked as an Associate Professor in the Dept. of CSE at Vishnu Institute of Technology, India.
He has 11+ years of teaching experience and is an individual researcher whose research interests are Cloud Computing, Internet of Things, Computer Security, Network Security and Blockchain.
He is a member of professional societies like IEEE, ACM, CSI and ISCA. He published several research papers which are indexed by SCIE, WoS, Scopus, Springer and others.
Leave a Reply