In this article we will look at how to create and work with various AWT controls available in the java.awt package along with sample code.
We can add and remove controls to a Container like Applet and Frame using the following methods available in the Container class:
Component add(Component ref)
Component remove(Component ref)
Label
A label is a GUI control which can be used to display static text. Label can be created using the Label class and its constructors which are listed below:
Label()
Label(String str)
Label(String str, int how)
The parameter how specifies the text alignment. Valid values are Label.LEFT, Label.CENTER or Label.RIGHT
.
Some of the methods available in the Label class are as follows:
void setText(String str) – To set or assign text to the label.
String getText() – To retrieve the text of a label.
void setAlignment(int how) – To set the alignment of text in a label.
int getAlignment() – To get the alignment of text in a label.
Following example demonstrates working with labels in AWT:
import java.awt.*;
import java.awt.event.*;

public class MyFrame extends Frame
{
	Label myLabel;
	MyFrame()
	{
		setSize(400, 200);
		setTitle("My Application");
		setLayout(new FlowLayout());
		setVisible(true);
		myLabel = new Label("This is a label!");
		add(myLabel);
		addWindowListener(new WindowAdapter()
		{
			public void windowClosing(WindowEvent we)
			{
				System.exit(0);
			}
		}
		);
	}
	public static void main(String[] args)
	{
		MyFrame mf = new MyFrame();
	}
}
Output of above code is as show below:
Buttons
A push button is the frequently found GUI control. A push button or a button can be created by using the Button class and its constructors which are given below:
Button()
Button(String str)
Some of the methods available in the Button class are as follows:
void setLabel(String str) – To set or assign the text to be displayed on the button.
String getLabel() – To retrieve the text on the button.
When a button is clicked, it generates an ActionEvent which can be handled using the ActionListener interface and the event handling method is actionPerformed(). If there are multiple buttons we can get the label of the button which was clicked by using the method getActionCommand().
Following Java code demonstrates working with buttons:
import java.awt.*;
import java.awt.event.*;

public class MyFrame extends Frame
{
	Button b1, b2, b3;
	MyFrame()
	{
		setSize(400, 200);
		setTitle("My Application");
		setLayout(new FlowLayout());
		setVisible(true);
		b1 = new Button("Red");
		b2 = new Button("Green");
		b3 = new Button("Blue");
		add(b1);
		add(b2);
		add(b3);
		addWindowListener(new WindowAdapter()
		{
			public void windowClosing(WindowEvent we)
			{
				System.exit(0);
			}
		}
		);
	}
	public static void main(String[] args)
	{
		MyFrame mf = new MyFrame();
	}
}
Output of the above code is as shown below:
Checkboxes
A checkbox control can be created using the Checkbox class and its following constructors:
Checkbox()
Checkbox(String str)
Checkbox(String str, boolean on)
Checkbox(String str, boolean on, CheckboxGroup cbGroup)
Checkbox(String str, CheckboxGroup cbGroup, boolean on)
Following are various methods available in the Checkbox class:
boolean getState() – To retrieve the state of a checkbox.
void setState(boolean on)– To set the state of a checkbox.
String getLabel() – To retrieve the text of a checkbox.
void setLabel(String str) – To set the text of a checkbox.
A checkbox when selected or deselected, generates an ItemEvent which can be handled using the ItemListener interface and the corresponding event handling method is itemStateChanged().
Following code demonstrates working with checkboxes:
import java.awt.*;
import java.awt.event.*;

public class MyFrame extends Frame
{
	Checkbox c1, c2;
	MyFrame()
	{
		setSize(400, 200);
		setTitle("My Application");
		setLayout(new FlowLayout());
		setVisible(true);
		c1 = new Checkbox("Male");
		c2 = new Checkbox("Female");
		add(c1);
		add(c2);
		addWindowListener(new WindowAdapter()
		{
			public void windowClosing(WindowEvent we)
			{
				System.exit(0);
			}
		}
		);
	}
	public static void main(String[] args)
	{
		MyFrame mf = new MyFrame();
	}
}
Output of the above code is shown below:
In AWT, there is no separate class for creating radio buttons. The difference between a checkbox and radio button is, a user can select one or more checkboxes. Whereas, a user can select only one radio button in a group.
Radio buttons can be create by using Checkbox class and CheckboxGroup class as shown in the below code:
import java.awt.*;
import java.awt.event.*;

public class MyFrame extends Frame
{
	Checkbox c1, c2;
	CheckboxGroup cbg;
	MyFrame()
	{
		setSize(400, 200);
		setTitle("My Application");
		setLayout(new FlowLayout());
		setVisible(true);
		cbg = new CheckboxGroup();
		c1 = new Checkbox("Male", cbg, false);
		c2 = new Checkbox("Female", cbg, false);
		add(c1);
		add(c2);
		addWindowListener(new WindowAdapter()
		{
			public void windowClosing(WindowEvent we)
			{
				System.exit(0);
			}
		}
		);
	}
	public static void main(String[] args)
	{
		MyFrame mf = new MyFrame();
	}
}
Output of the above code is as shown below:
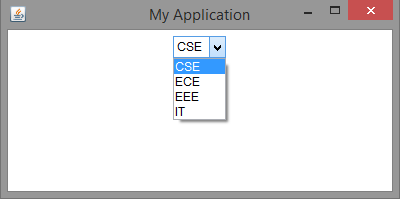
Dropdown Boxes
A drop down box or a combo box contains a list of items (strings). When a user clicks on a drop down box, it pops up a list of items from which user can select a single item.
A drop down box can be created using the Choice class. There is only one constructor in the choice class using which we can create an empty list.
Following are various methods available in Choice class:
void add(String name) – To add an item to the drop down list.
String getSelectedItem() – To retrieve the item selected by the user.
int getSelectedIndex() – To retrieve the index of the item selected by the user.
int getItemCount() – To retrieve the number of items in the drop down list.
void select(int index) – To select an item based on the given index.
void select(String name) – To select an item based on the given item name.
void getItem(int index) – To retrieve an item at the given index.
Whenever an user selects an item from the drop down box, an ItemEvent is generated. It can be handled using the ItemListener interface and the event handling method is itemStateChanged().
Following code demonstrates working with drop down boxes:
import java.awt.*;
import java.awt.event.*;

public class MyFrame extends Frame
{
	Choice myList;
	MyFrame()
	{
		setSize(400, 200);
		setTitle("My Application");
		setLayout(new FlowLayout());
		setVisible(true);
		myList = new Choice();
		myList.add("CSE");
		myList.add("ECE");
		myList.add("EEE");
		myList.add("IT");
		add(myList);
		addWindowListener(new WindowAdapter()
		{
			public void windowClosing(WindowEvent we)
			{
				System.exit(0);
			}
		}
		);
	}
	public static void main(String[] args)
	{
		MyFrame mf = new MyFrame();
	}
}
Output of the above code is:
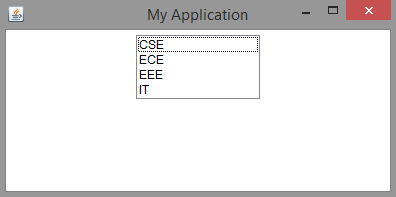
List Boxes
A List box contains a list of items among which the user can select one or more items. More than one items in the list box are visible to the user. A list box can be created using the List class along with the following constructors:
List()
List(int numRows)
List(int numRows, boolean multipleSelect)
In the above constructors, numRows specifies the number of items to be visible to the user and multipleSelect specifies whether the user can select multiple items or not.
When a list item is double clicked, ActionEvent is generated. It can be handled with ActionListener and the event handling method is actionPerformed(). We can get the name of the item using getActionCommand() method.
When a list item is selected or deselected, ItemEvent is generated. It can be handled with ItemListener and the event handling method is itemStateChanged(). We can use getItemSelectable() method to obtain a reference to the object that raised this event.
Following are some of the methods available in the List class:
void add(String name) – To add an item to the list box.
void add(String name, int index) – To add an item at the specified index in the list box.
String getSelectedItem() – To get the item name which is selected by the user.
int getSelectedIndex() – To get the item index which is selected by the user.
String[] getSelectedItems() – To retrieve the selected item names by the user.
int[] getSelectedIndexes() – To retrieve the selected item indexes by the user.
int getItemCount() – To retrieve the number of items in the list box.
void select(int index) – To select an item based on the given index.
String getItem(int index) – To retrieve the item at the given index.
Following code demonstrates working with list boxes:
import java.awt.*;
import java.awt.event.*;

public class MyFrame extends Frame
{
	List myList;
	MyFrame()
	{
		setSize(400, 200);
		setTitle("My Application");
		setLayout(new FlowLayout());
		myList = new List();
		myList.add("CSE");
		myList.add("ECE");
		myList.add("EEE");
		myList.add("IT");
		add(myList);
		addWindowListener(new WindowAdapter()
		{
			public void windowClosing(WindowEvent we)
			{
				System.exit(0);
			}
		}
		);
		setVisible(true);
	}
	public static void main(String[] args)
	{
		MyFrame mf = new MyFrame();
	}
}
Output of the above code is shown below:
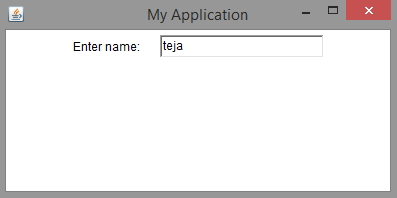
Text Fields
A text field or text box is a single line text entry control which allows the user to enter a single line of text. a text field can be created using the TextField class along with its following constructors:
TextField()
TextField(int numChars)
TextField(String str)
TextField(String str, int numChars)
In the above constructors numChars specifies the width of the text field, and str specifies the initial text in the text field.
When an user hits ‘Enter’ key on the keyboard in a text field, an ActionEvent is generated. It can be handled using ActionListener and the event handling method is actionPerformed().
Whenever an user modifies the text in the text field, a TextEvent is generated which can be handled using TextListener and the event handling method is textValueChanged().
Following are various methods available in TextField class:
String getText() – Retrieves the text in the text field.
void setText(String str) – Assigns or sets text in the text field.
String getSelectedText() – Retrieves the selected text in the text field.
void select(int startindex, int endindex) – To select the text in text field from startindex to endindex – 1.
boolean isEditable() – To check whether the text field is editable or not.
void setEditable(boolean canEdit) – To make a text field editable or non-editable.
void setEchoChar(char ch) – To set the echo character of a text field. This is generally used for password fields.
boolean echoCharIsSet() – To check whether the echo character for the text field is set or not.
char getEchoChar() – To retrieve the current echo character.
Following code demonstrates working with text fields:
import java.awt.*;
import java.awt.event.*;

public class MyFrame extends Frame
{
	Label myLabel;
	TextField tf;
	MyFrame()
	{
		setSize(400, 200);
		setTitle("My Application");
		setLayout(new FlowLayout());
		myLabel = new Label("Enter name: ");
		tf = new TextField(20);
		add(myLabel);
		add(tf);
		addWindowListener(new WindowAdapter()
		{
			public void windowClosing(WindowEvent we)
			{
				System.exit(0);
			}
		}
		);
		setVisible(true);
	}
	public static void main(String[] args)
	{
		MyFrame mf = new MyFrame();
	}
}
Output of the above code is as shown below:
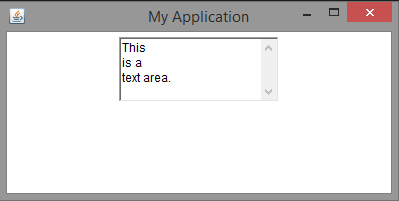
Text Areas
A text area is a multi-line text entry control in which user can enter multiple lines of text. A text area can be created using the TextArea class along with the following constructors:
TextArea()
TextArea(int numLines, int numChars)
TextArea(String str)
TextArea(String str, int numLines, int numChars)
TextArea(String str, int numLines, int numChars, int sBars)
In the above constructors, numLines specifies the height of the text area, numChars specifies the width of the text area, str specifies the initial text in the text area and sBars specifies the scroll bars. Valid values of sBars can be any one of the following:
SCROLLBARS_BOTH
SCROLLBARS_NONE
SCROLLBARS_HORIZONTAL_ONLY
SCROLLBARS_VERTICAL_ONLY
Following are some of the methods available in the TextArea class:
String getText() – To retrieve the text in the text area.
void setText(String str) – To assign or set the text in a text area.
String getSelectedText() – To retrieve the selected text in a text area.
void select(int startindex, int endindex) – To select the text in text field from startindex to endindex – 1.
boolean isEditable() – To check whether the text field is editable or not.
void setEditable(boolean canEdit) – To make a text field editable or non-editable.
void append(String str) – To append the given string to the text in the text area.
void insert(String str, int index) – To insert the given string at the specified index.
void replaceRange(String str, int startIndex, int endIndex) – To replace the text from startIndex to endIndex – 1 with the given string.
Following code demonstrates working with text areas:
import java.awt.*;
import java.awt.event.*;

public class MyFrame extends Frame
{
	TextArea ta;
	MyFrame()
	{
		setSize(400, 200);
		setTitle("My Application");
		setLayout(new FlowLayout());
		ta = new TextArea(3, 20);
		add(ta);
		addWindowListener(new WindowAdapter()
		{
			public void windowClosing(WindowEvent we)
			{
				System.exit(0);
			}
		}
		);
		setVisible(true);
	}
	public static void main(String[] args)
	{
		MyFrame mf = new MyFrame();
	}
}
Output of the above code is shown below:

Suryateja Pericherla, at present is a Research Scholar (full-time Ph.D.) in the Dept. of Computer Science & Systems Engineering at Andhra University, Visakhapatnam. Previously worked as an Associate Professor in the Dept. of CSE at Vishnu Institute of Technology, India.
He has 11+ years of teaching experience and is an individual researcher whose research interests are Cloud Computing, Internet of Things, Computer Security, Network Security and Blockchain.
He is a member of professional societies like IEEE, ACM, CSI and ISCA. He published several research papers which are indexed by SCIE, WoS, Scopus, Springer and others.
Leave a Reply